Showing posts with label diy. Show all posts

Wednesday, February 13, 2013

I Just Went All Martha Stewart On You Over Here

Last week I posted about some of my favorite DIY Valentines.  And would you believe I actually got around to doing a couple of them today?!  Me either!!!  Thank you, Pinterest for the adorable ideas!

And yes, I know Hayes is only 14 months old, but since I pretty much dropped the ball on Halloween (went back to work!) and Christmas (down with the flu!), I decided to get into Valentine's Day!  I thought these Love Bugs were too cute-and a good alternative to candy for the little ones in Hayes's class.  They couldn't have been easier and only cost me $3 for the bugs (my sister kindly shared her paper with me, so I didn't have to buy anything else!).


Get instructions for your Love Bug Valentines here.

I also wanted to do a little something for Hayes's sweet teachers.  2 crafts in one night-hence the reason why I'm nicknaming myself Martha Stewart-just for one night.  Then I'll go back to being my regular ole' self.


Not as cute as the love bugs since I hand wrote them, but my creative energy was running low at this point!

Get instructions for your happy hands here.

What about you, Wayman Family Nesters?  Have you been getting your craft on for Valentine's Day?


Pin It

Tuesday, February 5, 2013

DIY Valentines

Lately, I've been ready to get my Valentine "craft on."  (since you know, Halloween and Christmas decor were pretty much a no-go around here!)  I guess I prefer to peruse Pinterest and create a collection JUST IN CASE I was to find tons of extra time to make cute stuff.  Hayes is too young to really understand giving Valentines or to take any to his classmates.  But I might just have to make something for his teachers and family.  I like the idea of a candy-alternative valentine.  Just call me the Scrooge of Valentine's Day!


 4.  Bee mine               5.  Arrow valentine               6.  Have a ball

7.  Love bug           8.  You rule            9.   I dig you


What about you, Wayman Family Nesters?  Do you go with store-bought or handmade valentines?  Do you have the time to get crazy crafty?  What's your favorite from my little cyberspace round-up?  
Pin It

Friday, October 19, 2012

Friday Finds: Pumpkin Roundup

Hello, Wayman Family Nesters and Happy Friday!  Since we have yet to buy a pumpkin in the Wayman house, I thought I would share some lovely pumpkins that I found that inspired me while perusing Pinterest.  I'll admit that I haven't been in the Halloween spirit this year (I still have yet to make Hayes a costume!), so beauts are sure to get me in the mood.


8. Moth decal pumpkin   9.  Crayon dripped pumpkin    10.  Hometown pride pumpkin 


I don't know if I'll feel ambitious enough to tackle any of these.  We usually do a pumpkin-carving contest at my parents' house.  But I thought these were nice alternatives to the traditional carved pumpkins.  What about you?  Carved or artsy pumpkins?

Happy Friday y'all!
Pin It

Thursday, October 11, 2012

Halloween Costume Dilemma

Time to talk Halloween costumes, Wayman Family Nesters!  I have always loved Halloween and planning my costume.  This year we have our sweet little Hayes to dress up.  I figure I should have fun with it since we'll only have a few years before he has a say in it and mommy won't anymore!

So give me a shout with your vote.  (I'm hoping you'll come through for me this time since my iPhone 5 cover dilemma still hasn't been resolved)  Your comments make my day!


1. Cotton candy  2. Clark Kent  3. Spaghetti & meatballs  4.  Max   5.  Baby Yoda            6.  Scuba baby   7.  Mousetrap
Pin It

Wednesday, November 23, 2011

DIY Wreath Round-Up

With Christmas around the corner and a week off for Thanksgiving, I think it's safe to say that I've been bitten by the craft bug!  So I rounded up some easy, DIY wreaths for you to try out this Christmas season.

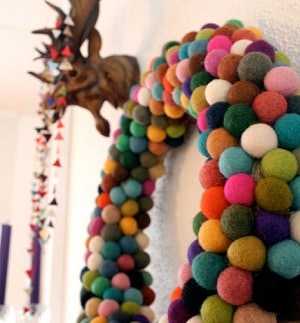
How adorable is this felt ball wreath?  This would make a colorful addition to your Christmas decor that the kids would sure to love!

baby deals


This stunning trio would be sure to wow your guests when they arrive at your home!

Pinned Image


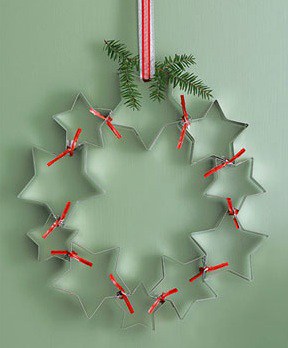
And what about this adorable cookie cutter wreath?  It looks simple enough-I think even I could tackle this one!

baby deals


This adorable wreath would be a fun way to hold all of your Christmas cards!

Pinned Image

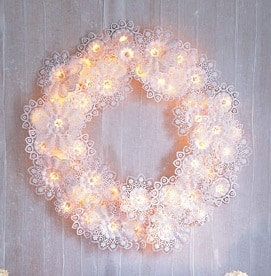
This beautiful wreath is made from paper doilies and white lights.This one would be sure to make a statement in any part of your home!

baby deals


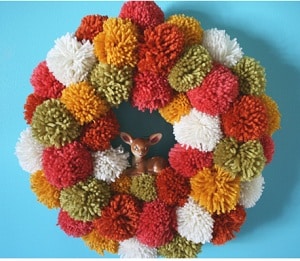
This homemade pom pom wreath is  another colorful one that would be sure to please the kiddos!
  
baby deals


This present wreath would be sure to make a cheery addition to your home!


This cheap and easy peppermint wreath would be sure to brighten your spirits this holiday season.

Pinned Image


Yarn=Love. Wreaths=Love.  Put them together=Pure genius!  Try your hand at this yarn ball wreath.


This kid-friendly wreath would be fun to have "hanging around" this holiday season (I'm cracking myself up as we speak I write!)


So there you have it, Wayman Family Nesters!  10 of my favorite wreaths for this holiday season.  I don't know how I'll ever choose which one(s) to do!  But I'll be sure to post pictures of the finished product(s).  Do you plan to try your hand at any wreaths as you begin to decorate?
Pin It

Monday, September 12, 2011

Roomspiration Blog Hop & Link Party

Today's the first day of the Roomspiration Blog Hop and Link Party!

Abode Love is kicking off the fun today with entryways.  So grab your best post (new or old) about your entry and head on over to Abode Love to link up.  I'll be linking up to my beloved striped hallway I posted about a couple of months ago.


Here's the full schedule of the Roomspiration Parties!


Happy Monday Wayman Family Nesters!
Pin It

Monday, August 22, 2011

Guest Posting at Home for Hire

I was so excited when Nicole from Home for Hire contacted me a few weeks ago about doing a guest post on her fabulous blog! 

So go check it out today here:

Home for hire

Nicole also has an amazing etsy shop that you MUST check out when she return from vacation!

Happy Monday Wayman Family Nesters! Pin It

Friday, August 19, 2011

Guest Posting at Everyday Mom Ideas

Happy Friday Wayman Family Nesters!  You can find me today over at Everyday Mom Ideas guest posting about 3 cheap and easy DIY jewelry projects.

Everyday Mom Ideas

A big thank you to Julia for asking me to write my VERY FIRST guest post!  So go check it out and tell me what you think!

Happy Friday everyone! Pin It

Wednesday, July 13, 2011

Seeing Stripes

I love stripes.  Like seriously, I'm obsessed.  You know it's pretty bad when your students point out that you wear stripes AT LEAST three days a week.  I love middle schoolers.  They notice everything!

I have had room stripe envy for some time now.  I somehow convinved the hubby that striping our hallway was a MUST!  Being the darling that he is, he dropped everything one weekend to help me. I am just the one who comes up with these grand plans.  He is the brains behind the operation.  Since I really had NO idea of where to start, I employed him to help me!

Here are a few awesome pictures of my stripe inspiration...

I first became smitten with stripes after seeing this bathroom from Young House Love.  I love the subtle tone on tone stripes.  I guess you could say it was love at first STRIPE!


These images from Abode Love were my favorite and my main source of inspiration!  Beautiful!


After seeing those photos, I decided the hallway was the room to stripe.   Here's a before shot of the hallway when we moved in...


Yikes!  Just look at that blue carpet and wallpaper.  Not to mention the eyesore of a fireplace in the middle of the dining room.  I don't really have a great shot of the hallway once we painted it gray, so this will have to do...


Step 1: Math Skills Required: Measuring- Measure the full length of your wall and divide that number by twice the number of stripes that you want to have minus one (ex: our wall is 90″ tall and we wanted seven horizontal stripes so we divided 90 by 15 (8 x 2 = 16 – 1 = 15) to get the thickness of each stripe. Ours came out to 6 inches.  You want an odd number of stripes so that the top and bottom are both the same color.
Step 2: Make Your Mark- Use a ruler to mark off every 6minches starting from the floor and working up to the ceiling
Step 3: Tape It Off- Grab some painter’s tape (We used Frog Tape) and connect your pencil markings to create taped off stripes (once the tape is in place rub it a few times so you know that it’s flush with the wall for cleaner lines). The main thing to remember is that the tape should go outside the marks for the stripes you’ll be painting but inside the marks in the negative space that you won’t be painting. Confused?  I know, that's why I had the hubby do it!


Step 4: Roll With It- Grab a good roller, some paint, and start rolling. Apply two even,thin coats of latex paint between the tape that’s further apart to create your stripes.
Step 5: Take it Off!- This is a VERY important step. It’s crucial that you remove every strip of tape as soon as you’re done with your second coat of paint while the paint is still wet.  Waiting to remove the tape until after the paint has fully dried will cause peeling and uneven lines that are less than crisp (which would make you want to cry after all that taping). As soon as your roller is down, start pulling that tape off the wall for a clean stripe that looks seamless and sleek.


There you have it!  Easy horizontal stripes, right?  The hallway has quickly become my favorite space in the house  It makes me so happy whenever I look at it!  Oh, and if you're wondering about our paint colors, our hallway was already Sterling by Behr.  For the stripe I chose Martha Stewart Precious Metals.
What about you, Wayman Family Nesters?  Stripes: love em' or hate em'?  And if you love em', what room in your house have you striped? Pin It

Friday, July 1, 2011

Easy Button Monogram Art

This past weekend I was out of town for my cousin's wedding in Chattanooga (read about that here and here).  I decided to make her a personal gift featuring a button monogram with her new last name. What new bride doesn't love to display something with their new last name?  And who doesn't love buttons?!  The perfect combination!

First, I decided on which scrapbook paper and button combination I wanted to use.  I went with an antique floral-looking paper.  I decided to use different shades of white buttons.  I think that this look works best if you choose 1 color family for the buttons.

(Excuse the pictures in this post.  I had to use my phone.  The hubby took our camera on his trip out west).


Next, I found the right font and size for her initial, which happens to be "F."  (I went with Vivaldi size 438 to be exact).  I made the font color a grayish-white because you can see through some of the buttons and a black font stands out too much.  Then, I cut out the letter "F."


Then I placed all of the buttons on the letter to get an idea of how many to use and approximately where I wanted them to go. 


Then I removed all of the buttons and glued the letter to the scrapbook paper. 


One by one, I hot glued each button to the letter.  Once I was finished, I went back and layered the buttons on top of each other for a more textured look.


Then I popped it into a frame and done! There is not room for the glass once it's in the frame, but I liked the 3-D look without it.   Easy, right?


My little sister loved it so much she wanted to make one for a friend's upcoming wedding and one for her and her roommate for their dorm. 


I think hers is my favorite!  I LOVE the combination of the blue stripes with the orange buttons.  So cute!


So there you have it!  This would make a great gift for a newlywed, college graduate, a friend, or just to have in your own home. Which monogram is your favorite? Pin It

Thursday, February 17, 2011

Pull Up a Chair

Yes, my title is that cheesy witty.

Back in December when I was on Winter Break, I decided to hit up the local Goodwill. I was looking for a chair for our living room for a desk that we have yet to buy (Yes, sometimes I'm that person that does things backwards like buy a skirt and then have to buy a top to go with it). Then I saw it.....just what I was looking for!

And the price was well within my budget at $6.99! A sweet lady approached me and told me what a nice piece of furniture it was (SO heavy) and how to take the seat out to recover it. I also bought a lamp that I have plans to repaint (I will post on that when I do).


On the way home I stopped to buy fabric to recover the seat and paint from Home Depot. And yes, hubby (if you ever decide to read this), I can find my way around Home Depot without you! My husband was a little worried when I randomly called to ask where we keep the sandpaper and paint brushes! I'm not much of a handy woman around here! When I got home I went straight to work.

First, I removed the seat cushion with a screwdriver. Then, I lightly sanded the entire chair with some fine-grit sandpaper. After I painted one coat, I recovered the seat cushion while it dried. All I did was center the fabric up (so the print would look right) and staple it with a staple gun at the back.After the first coat had dried, I applied a second. When the second coat had dried, I sanded the edges of the chair to give it a more "worn" look.

This is a close-up of the yummy looking seat before...

I was thrilled with how the chair turned out! I'm sure it's meant to be at a dining room table or desk, but for now, it's sitting in our living room. It's way to cute to not be shown off! And it goes well with the mustard theme that I've got going on right now in our living room!

And here she is in all her glory! This is the finished product!
(Just a reminder that earlier I did mention this project was undertaken in December. My Christmas tree is NOT still up! I felt the need to clear that up!)

And here's a close-up of the seat after...
(LOVE the fabric)

Well, there you have it! My very first DIY project! Not rocket-science, I know! But I'm pretty happy with how it turned out (if I do say so myself!). Pin It